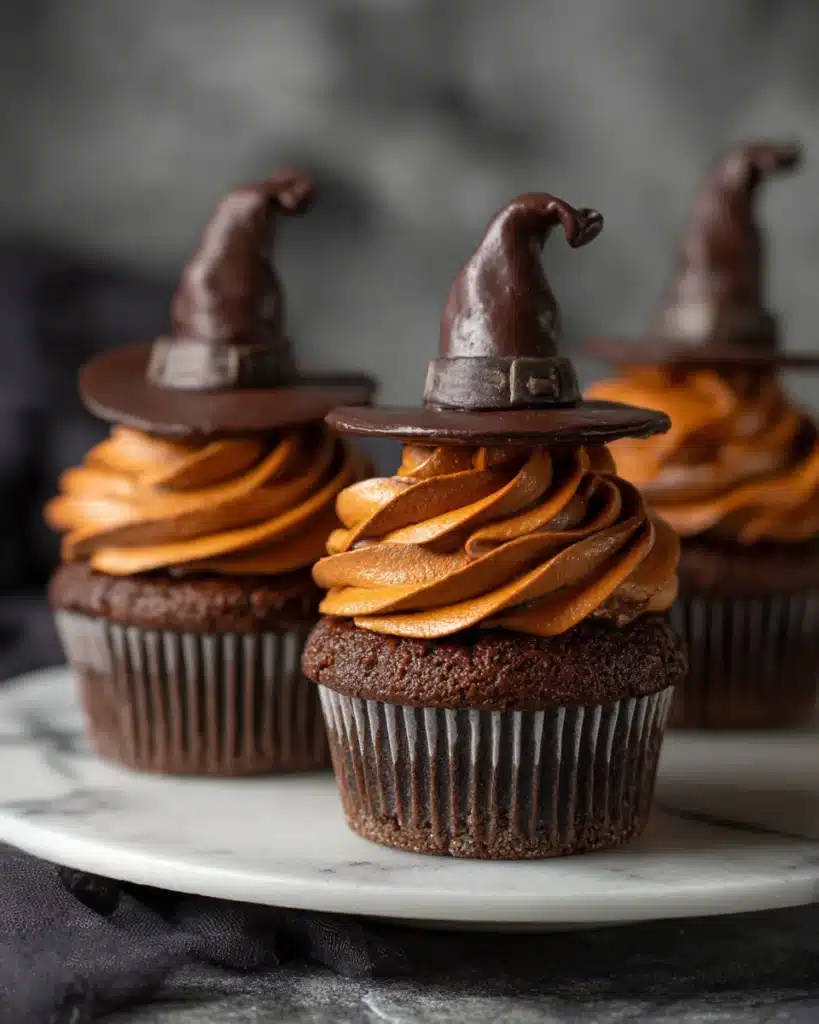
Looking for a Halloween treat that’s as fun to look at as it is delicious to eat? These Witch Hat Cupcakes are just what you need to bring a little spooky sweetness to your celebrations. With moist chocolate cake, creamy frosting, and an adorable pointed hat on top, these witch hat cupcakes never fail to charm both kids and adults alike.

I’m obsessed with these cupcakes because they combine rich flavors and playful presentation in every bite. Whether you’re hosting a party or just want a festive dessert, these witch hat cupcakes will delight your guests and become a seasonal favorite.
Why I Can’t Stop Making These Cookies
- Quick win: From batter to decorated treats in under an hour, perfect for last-minute fun.
- Flavor twist: Deep chocolate cupcakes paired with a subtly spiced frosting that hints of cinnamon and nutmeg.
- Pantry-friendly: Most ingredients are staples, so chances are you have what you need without extra trips.
- Kid-friendly: Fun to decorate together, and the perfect size for little hands to enjoy.
- Seasonal appeal: The witch hat topper captures all the Halloween vibes without being too scary for younger eaters.
What Type of Chocolate Should I Use?
For the richest cupcakes, I recommend using good-quality unsweetened cocoa powder or dark cocoa powder. This brings that deep chocolate flavor without overly sweet notes. If you prefer a milder taste, Dutch-processed cocoa powder works beautifully and riffs a bit more on smoothness.
When working with chocolate chips for decorating, semi-sweet or milk chocolate chips are best they melt evenly and hold their shape well when piped or drizzled. If using frozen berries or any fruit in your frosting or garnish, always thaw them completely, drain any excess liquid, and pat dry to avoid soggy batter or icing.
Options for Ingredient Alternatives
- Swap butter for coconut oil for a dairy-free option, but be sure to chill the dough to help it firm back up.
- Use white chocolate or dark chocolate chips instead of semi-sweet for the hat decorations, depending on your flavor preference.
- Replace cow’s milk with almond, oat, or soy milk for a dairy-free cupcake base.
- Vanilla extract can be swapped for almond or peppermint extract for a different flavor twist.
- Fresh pumpkin puree or mashed bananas can substitute some of the oil or butter for added moisture and a hint of fall flavor.
The Biggest Challenges While Baking
- Avoid overmixing the batter to keep cupcakes light and tender; mix until ingredients just come together.
- Make sure butter is softened but not melted to create the ideal cupcake texture.
- Fold any delicate additions like chocolate chips or sprinkles at the very end, gently, to avoid breaking.
- If your dough feels dry or crumbly, add a tablespoon of milk at a time until it reaches the right consistency.
- Chill the batter for about 30 minutes if the kitchen is warm it helps in managing the texture and makes decorating easier.
Storage & Freezing Instructions
These cupcakes keep well at room temperature for up to two days in an airtight container. For longer freshness, store in the fridge for up to a week, but bring to room temperature before serving to enjoy full flavor.
To freeze, place cupcakes in a single layer on a baking sheet and freeze until solid. Then transfer to a freezer-safe container or bag, layering with parchment paper to avoid sticking. They freeze well for up to three months. Thaw in the refrigerator overnight or on the counter for a few hours before decorating or serving.
If you want to make the dough ahead, wrap tightly and freeze for up to one month. Thaw overnight in the fridge, then bake as usual.
Estimated Nutrition
For this recipe batch (makes about 12 cupcakes):
- Calories: roughly 280–320 per cupcake
- Fat: 14–18 grams
- Carbohydrates: 35–40 grams
- Protein: 3–4 grams
- Sugar: 20–25 grams
Exact nutrition varies depending on ingredient substitutions and portion sizes.
Ingredients
- 1 cup granulated sugar (200 g)
- 1/2 cup unsalted butter, softened (115 g)
- 2 large eggs
- 1 tsp vanilla extract
- 3/4 cup unsweetened cocoa powder (75 g)
- 1 tsp baking powder
- 1/2 tsp baking soda
- 1/4 tsp salt
- 3/4 cup all-purpose flour (90 g)
- 1/2 cup milk (120 ml)
- 12 chocolate-covered cookie wafers for hat bases
- 12 chocolate kisses or ice cream cones for hat tops
- Edible decorations like orange sprinkles or edible glitter
Step-by-Step Instructions
- Preheat your oven to 350 degrees F (175 degrees C). Line a 12-cup muffin pan with cupcake liners and set aside.
- In a large bowl, cream the softened butter and sugar together until light and fluffy.
- Add the eggs one at a time, mixing well after each addition. Stir in the vanilla extract.
- In a separate bowl, sift together the cocoa powder, flour, baking powder, baking soda, and salt. Gradually add the dry ingredients to the wet ingredients, alternating with the milk. Begin and end with the dry ingredients.
- Mix until just combined do not overmix. Gently fold in any chocolate chips or sprinkles last.
- Fill each cupcake liner about two-thirds full with the batter. Bake for 18–20 minutes or until a toothpick inserted in the center comes out clean. Let cool completely on a wire rack.
- To assemble the witch hats, frost each cupcake with your favorite buttercream or cream cheese frosting. Place a chocolate-covered cookie wafer on top as the hat’s brim, then position a chocolate kiss or mini ice cream cone on top as the hat point. Decorate with sprinkles for a festive finish.
Tips, Variations & Serving Ideas
- Add a pinch of cinnamon or pumpkin pie spice to the batter for a cozy fall flavor.
- Use colored frosting to match your party theme purple, green, or classic black work great.
- Underbake by a minute or two for a gooey, fudgier center.
- Swap the cookie base for brownie bites for a richer hat brim.
- Store assembled cupcakes in the fridge and let them come to room temperature before serving.
- Turn these into mini cupcake bites by baking in mini muffin tins.
- For a vegan option, use flax eggs and coconut milk, along with dairy-free butter substitutes.
FAQs
Q: Can I make these cupcakes gluten-free?
A: Yes! Use your favorite gluten-free all-purpose flour blend in equal amounts.
Q: How long do the witch hat decorations stay fresh?
A: Chocolate hats are best used the same day but can hold up well refrigerated overnight.
Q: Can I prepare these cupcakes in advance?
A: Absolutely. Bake and freeze the undecorated cupcakes, then decorate after thawing.
Save This for Later (Pinterest)
Love these witch hat cupcakes as much as I do? Save this recipe to your Pinterest boards for a spooky, sweet Halloween treat you can make anytime! Sharing is caring, so pin it now!


Leave a Reply